Overview
In this comprehensive Gran Saga: Unlimited guide, we will provide you with the best strategies to maximize your character's potential and level up quickly in the immersive world of Gran Saga: Unlimited. With our guidance, you'll be able to fully enjoy the group-based content this game has to offer.
Upon entering the game, you will find yourself in a tutorial zone where you'll be equipped with a mysterious phone. This phone unlocks various functionalities, including the system room, mailing system, and the market (available at later levels). In the system room, you'll meet your helpful guide, Lillith, who will assist you throughout your journey starting around level 10.
Gran Saga: Unlimited Tutorial
During the tutorial, you'll learn the basics of combat, such as using your basic attack and abilities from your skill tree. To bind abilities to desired keys, simply drag them from the skill tree to the action bars. The action bars are numbered from one to zero and F1 to F10 on your keyboard. You can access the skill tree by clicking on the settings icon in the bottom right corner of the screen or by pressing 'K' on your keyboard. For more hotkeys, refer to the cheat sheet below:
Hotkeys
- Inventory: I
- Map: M
- Skills: K
- Quests: J
- Movement: W, A, S, D
- Auto Run: '
- Rest: X
- Interaction: F
- Phone:
Now, let's delve into the different classes and the recommended stats to focus on for each of them.
Gran Saga: Unlimited Classes
Gunner
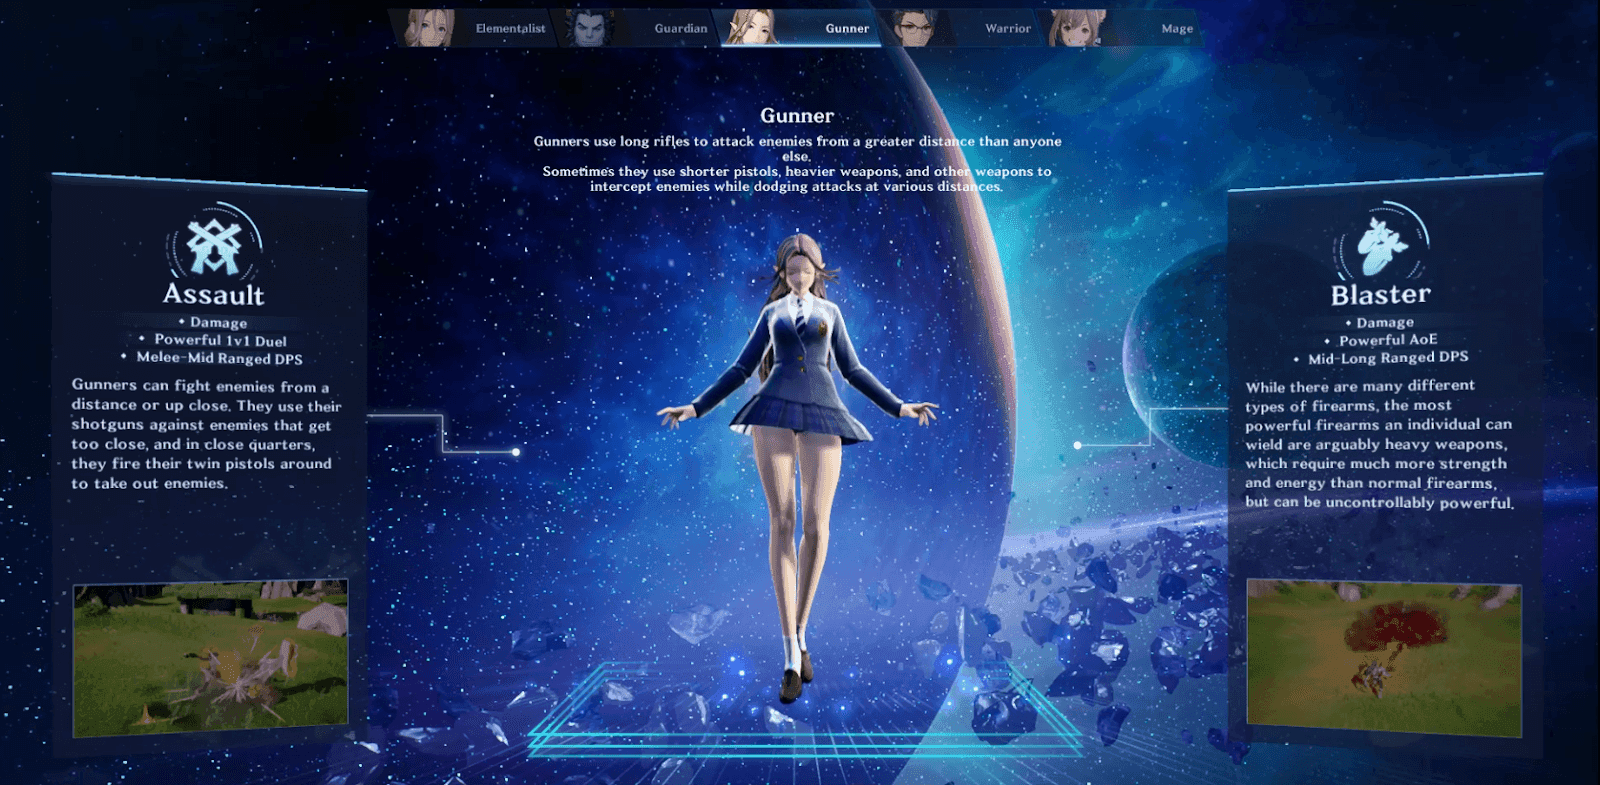
First, we have the Gunner class, which offers two augmentations: Blaster and Assault. Blaster specializes in mid-range to long-range combat, while Assault excels in melee to close-range combat. Both augmentations benefit from the dexterity and accuracy stats as their primary focus. The precise aim passive skill enhances damage through dexterity, while the sight alignment passive skill enhances accuracy.
Warrior

Next, we have the Warrior class, which consists of the Slayer augmentation. This melee-based class primarily emphasizes the strength stat to boost its damage output. The strengthening passive ability and Vitality strengthening ability both contribute to the strength and Vitality stats, respectively.
Elementalist
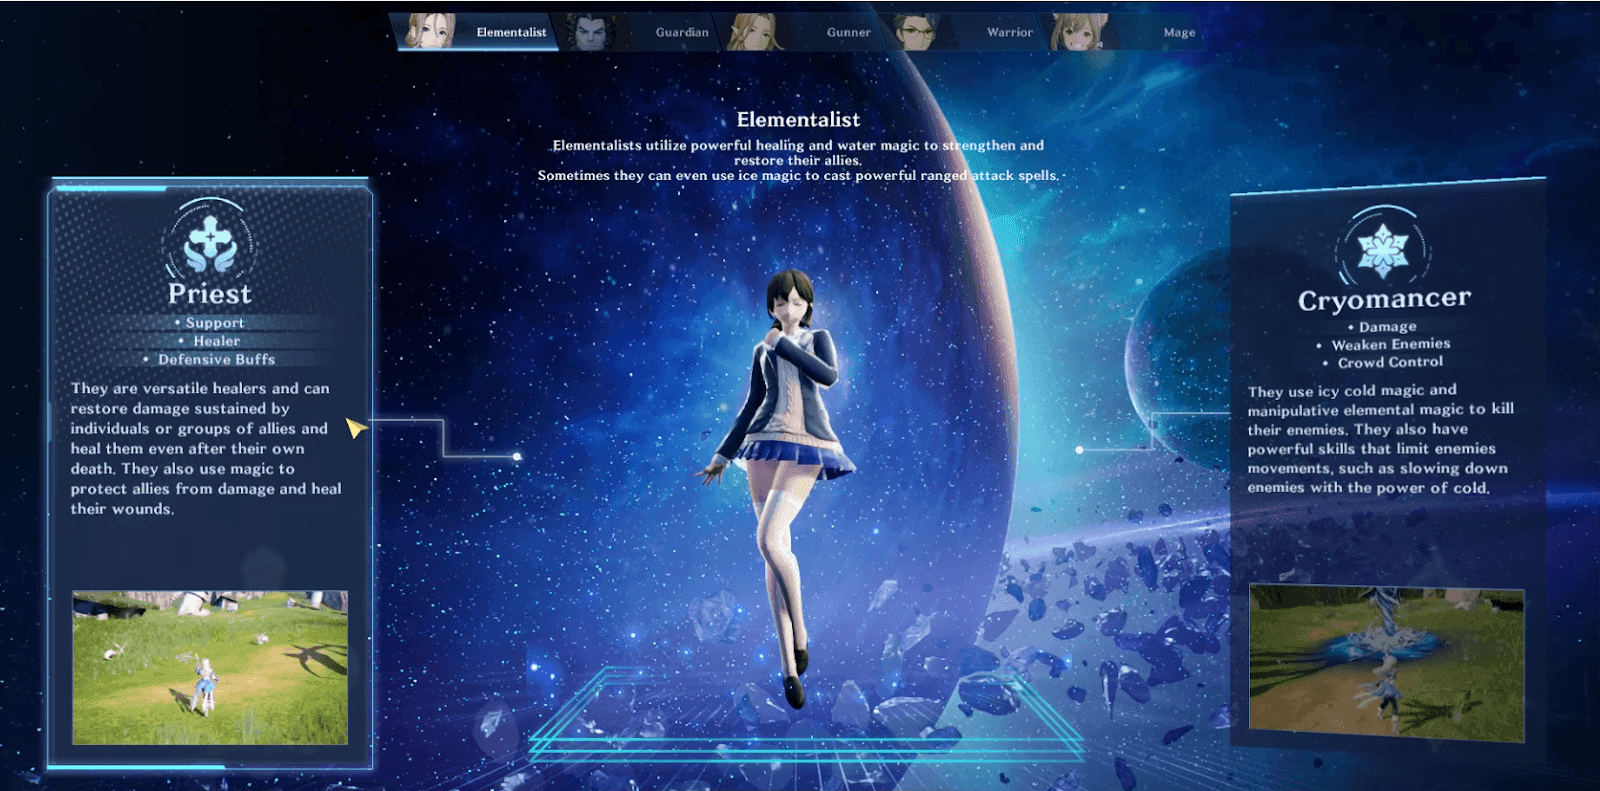
The Elementalist class offers two augmentations: Cryomancer and Priest. Cryomancer focuses on AoE damage and debuffs like slows, while Priest specializes in healing. Intelligence is the main stat for both augmentations, as it increases the effectiveness of their spells. The flowing water passive ability enhances total Mana points, and the Power of Life passive ability boosts the Intelligence stat.
Guardian
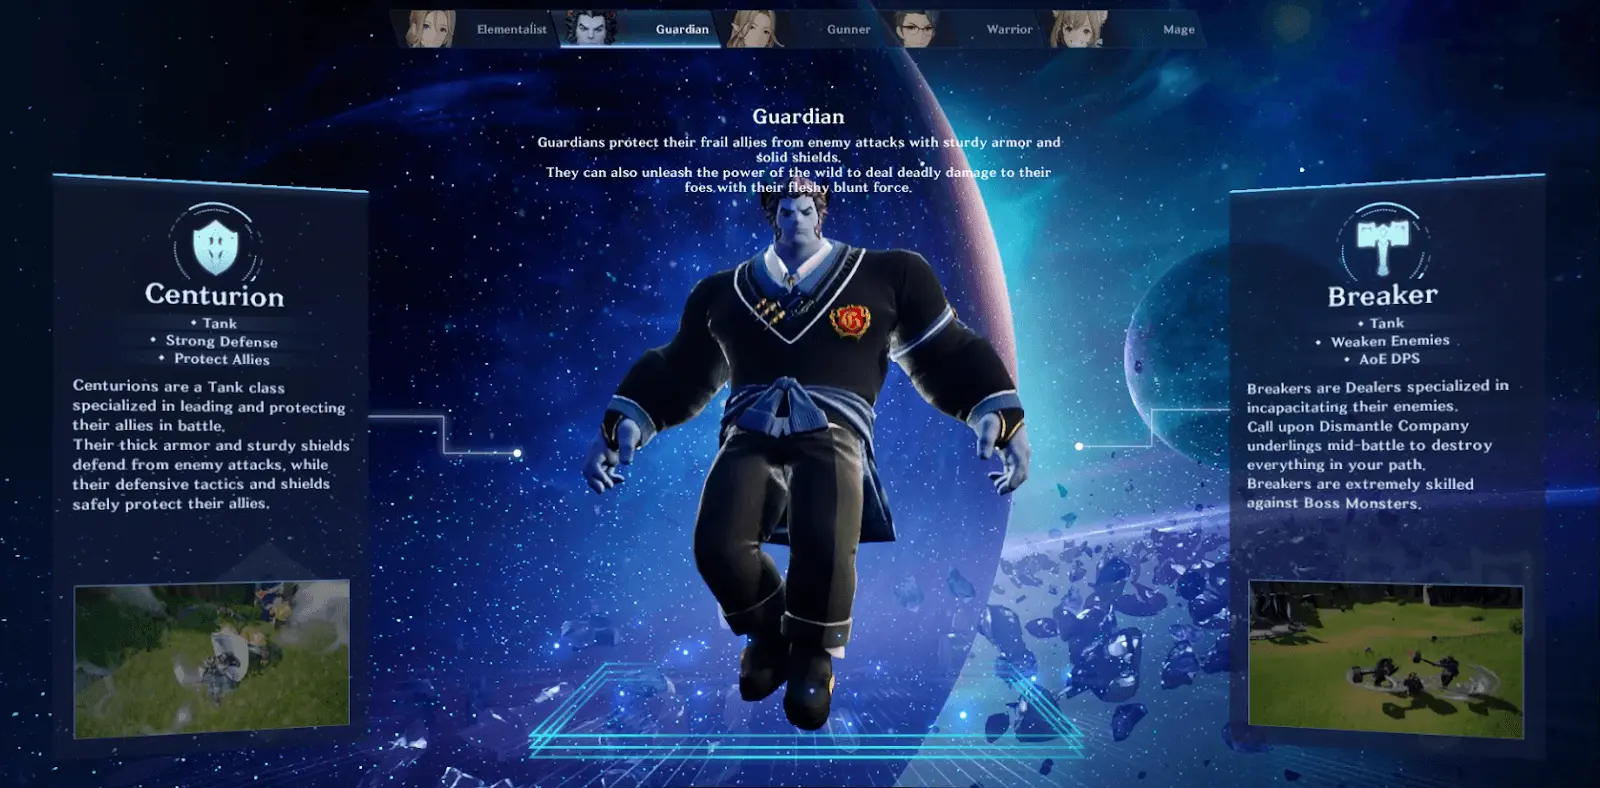
The Guardian class is a tank-focused class with two augmentations: Breaker and Centurion. Breaker emphasizes damage and disruption, while Centurion focuses on protecting allies with shielding abilities. Vitality is the main stat for this class, increasing health points, defense, and damage reduction. The frequent aerobic exercise passive ability enhances the vitality stat, while the full-body workout ability boosts the strength stat.
Mage

Lastly, we have the Mage class, which offers two specializations: Pyromancer, specializing in devastating AoE fire skills, and Summoner, offering a range of support abilities including resurrection and heals through summonable turrets. Intelligence is the primary stat for Mages, similar to the Elementalist class. The overflowing wisdom ability passively increases Intelligence, and the Open Mind ability boosts Mana Points.
Character Stats and Equipment Stats
To truly excel in Gran Saga: Unlimited, it's crucial to grasp the various stats and bonuses in the game. We've simplified this for you with the cheatsheet below. Understanding these stats will assist you in choosing the appropriate base-level equipment. However, things can become more intricate when factoring in the different bonuses that can be applied. The first summary provides an overview of the main stats, while the second summary offers a quick rundown of the effects equipment can have based on their generated bonuses.
Main Stats:
- Vitality: Increases Health
- Dexterity: Enhances dodge rate
- Intelligence: Boosts spell power
- Accuracy: Improves hit chance
- Infliction: Increases debuff application chance
- Resilience: Enhances debuff resistance
- Equipment Acquisition Rate: Increases equipment drop rate
- Material Acquisition Rate: Enhances material drop rate from defeated monsters
Equipment Bonuses:
- Ferocious: Increases Attack Power
- Lonely: Enhances Defense Penetration
- Clever: Increases maximum Mana Points
- Keen: Improves Critical Rate
- Brawny: Boosts Strength
- Bold: Provides extra Boss Damage
- Kind: Improves Healing Power
- Light: Increases Dexterity stat
- Sneaky: Enhances Infliction
- Efficient: Increases skill Haste
- Flowing: Boosts Intelligence
- Faithful: Enhances Critical Healing percentage
- Fundamental: Improves Normal Attack Damage
- Smart: Increases Intelligence stat
- Quivering: Boosts Strength stat
- Mana: Improves Mana regeneration
- Bursting: Increases Critical Damage percentage
- Initiate's: Improves overall Damage
- Encouraging: Increases maximum Health Points
- Germinant: Boosts Vitality points
- Curious: Enhances experience gained percentage
- Greedy: Increases equipment acquisition percentage
- Superior: Boosts Block Rate percentage
- Obsessive: Enhances Material Acquisition percentage
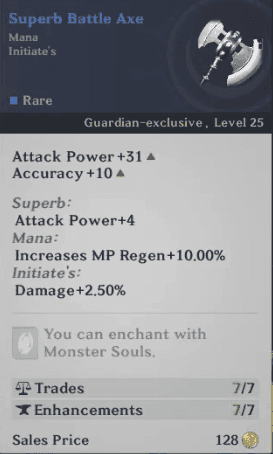
But the improvement of equipment doesn't stop there. Each piece of equipment can be enchanted with scrolls that provide additional bonuses. Success rates for applying scrolls can vary, making them highly valuable within the game. Each equipment piece can have a maximum of seven scroll enhancements. It's advisable to save the best scrolls for later stages of the game, as the equipment you wear is likely to remain equipped for a longer duration, ensuring you make the most of these precious scrolls.
In addition to scrolls, there are also monster souls that can be applied to equipment, with a maximum of one soul per piece. Monster souls provide various stat bonuses, typically acquired later in the game around levels 15-20.
Now that you have a basic understanding of each class, their roles within the game, the associated equipment, and the essential stats to make them effective, it's time to focus on leveling up. We've divided the first 25 levels into five segments, making it easier for you to follow along and progress without feeling overwhelmed by the grind.
Gran Saga: Unlimited Level Up Guide:
Level 0 – 5

After completing the initial tutorial, you will reach level 2 and enter Bad Sector 73. Here, you will embark on your first set of missions alongside friendly NPCs. Begin by helping five NPCs, collecting potions from the pond behind the first NPC, and assisting their friend in the left corner. You will then have two quests to defeat creatures on a similar level before progressing to a quest where you gather herbs and eliminate mushroom-like creatures.
Upon completing these tasks, head towards the main area of Bad Sector 73, where you will encounter aggressive Pigors and Nebarks, indicated by their names appearing in red instead of yellow. Yellow-named creatures will not attack you unless provoked.
Defeat the Pigors and Nebarks, and then challenge the Pigor Captain, who possesses considerably more health than other creatures. It's advisable to team up with another player in the area to make this encounter easier. Remember, the majority of your experience will come from quest completion rather than creature slaying.
Once the captain is defeated, search for the Memory Crystal in the top right of the map. There, you will witness an old memory through a cut scene. After watching, interact with the crystal again to complete the quest, granting you the recall functionality on your phone.
Quick leveling tip: Take all available quests, as many objectives overlap, allowing for efficient progression.
Refer to the map below to locate NPCs and the final memory crystal. To find creatures for quest objectives, open the quest journal and select "locate" for the desired quest. This will provide an orange overlay on the map, indicating the objective's location.
Level 5 – 10
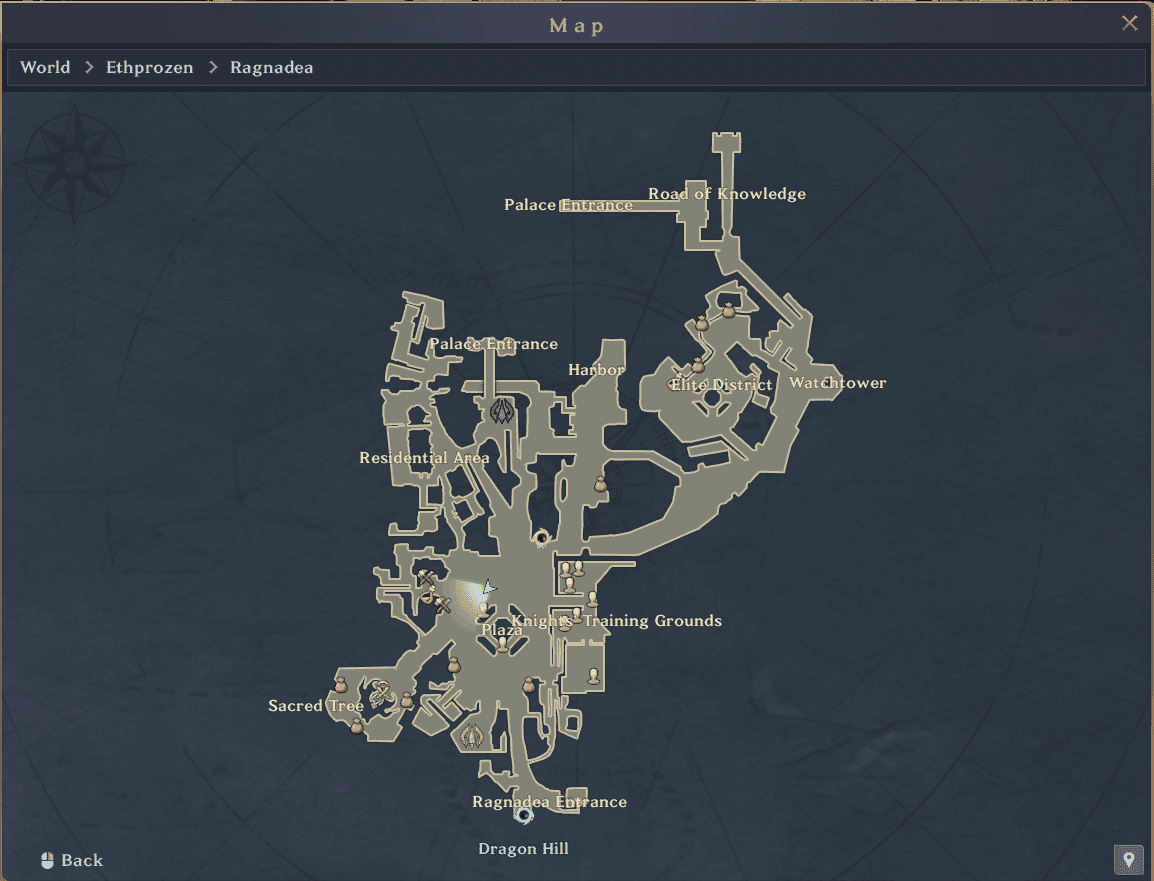
Congratulations! You have reached the bustling city of Ragnadea, the central hub of the game. Here, you will frequently visit to purchase potions, food, dismantle equipment, and even try your luck at the lottery. Upon arrival, head to the Sacred Tree located in the bottom left of the map to complete a quest that teaches you how to enhance a weapon with a scroll.
Afterward, interact with the potion vendor to complete a simple task, leading to a quest where you visit the blacksmith to dismantle your first piece of armor. Speak to the NPC opposite the blacksmith, and just like that, you will be level 7!
Looking good so far, right? Take this opportunity to stock up on sweet candy from the food vendor, located across from the potion vendor near the Sacred Tree. Your next destination is the first Warp Hole, which will transport you to Dragon Hill, where you will spend your time until reaching the later teen levels.
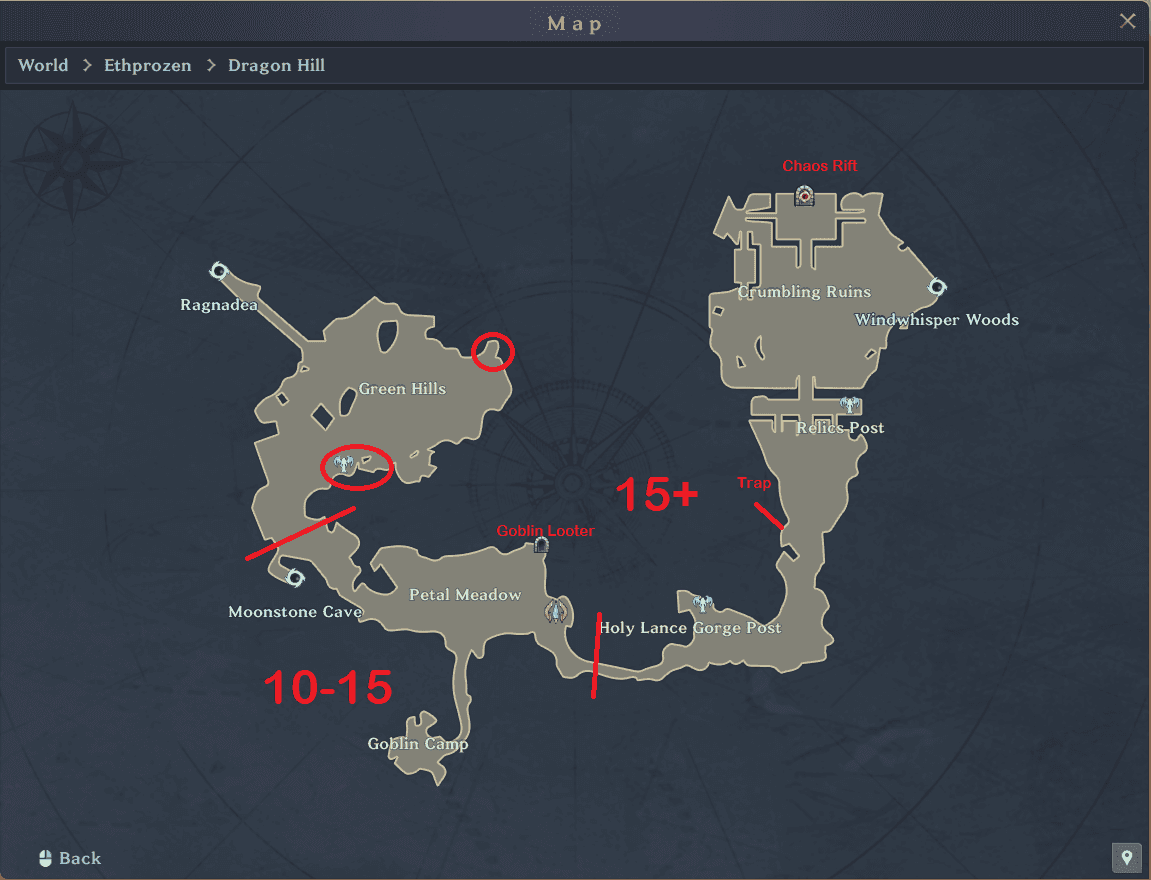
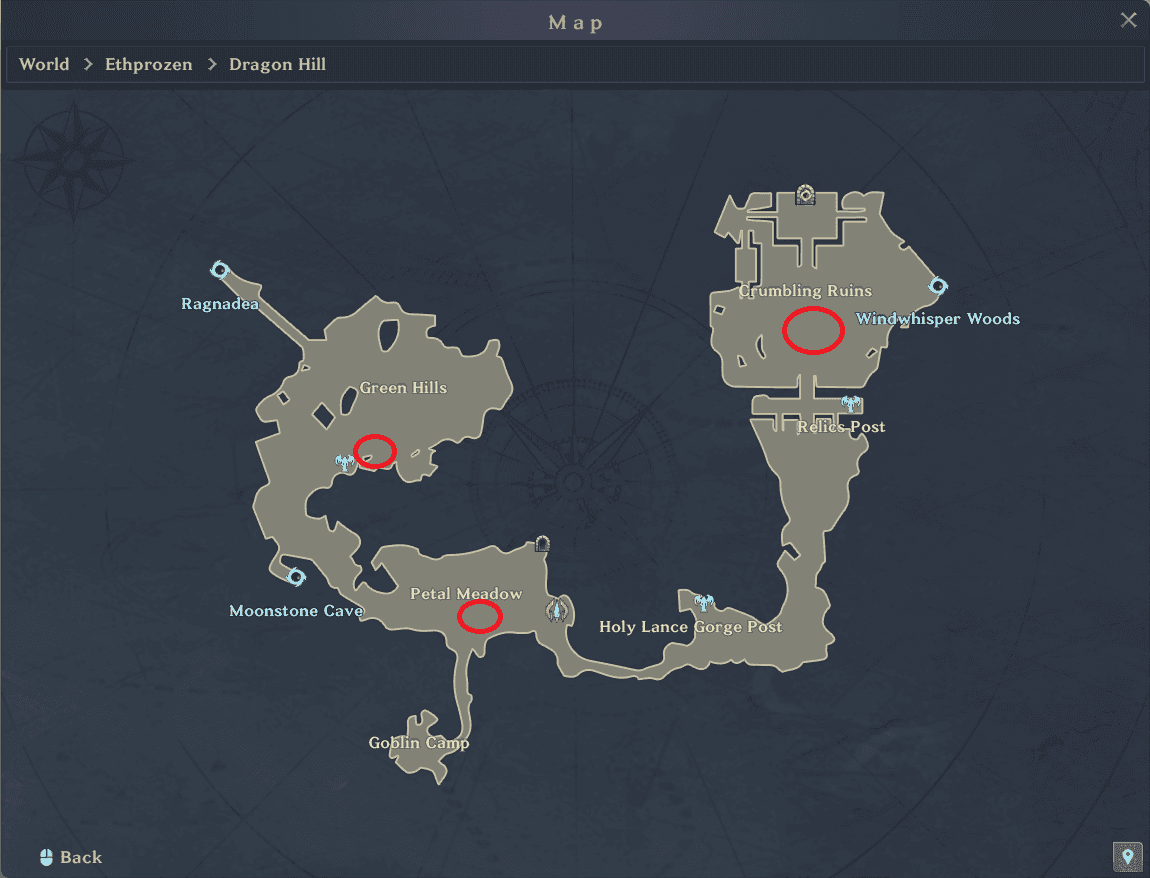
Once in Dragon Hill, make your way to the Green Hills area. On the far side, you will meet an NPC named Fiona, who will instruct you to gather notes from soldiers in Green Hills and defeat King Mumu, who resides in the center of the area. It's advisable to wait until you have completed all the other quests in Green Hills before facing King Mumu to make the encounter easier.
However, if there are plenty of people around, don't hesitate to join in the fun and complete the quest together! The other quests involve slaying various creatures in Green Hills, which should be manageable for any character. Remember to keep an eye on your mana and use the food you purchased earlier to replenish it. One of the final quests will require you to find crystals, which can be found in the top right-hand corner of Green Hills.
Upon reaching level 8, you will gain access to your mail system, where you will find XP scrolls that grant double experience for 15 minutes per use, as well as Fatigue Potions. Keep these items safely stored as they will be incredibly useful later on. While you may be tempted to use the XP Scrolls, it's recommended to save them for your first rift run, as the experience gained inside a rift is substantial.
Once all quests in Green Hills are completed, speak to Professor Bell south of the camp, and you will reach level 10!
Refer to the map below to locate the NPCs in Green Hills and find the crystals. Other areas are divided based on their designated level difficulty, which will be explained later in the guide.
Level 10 – 15

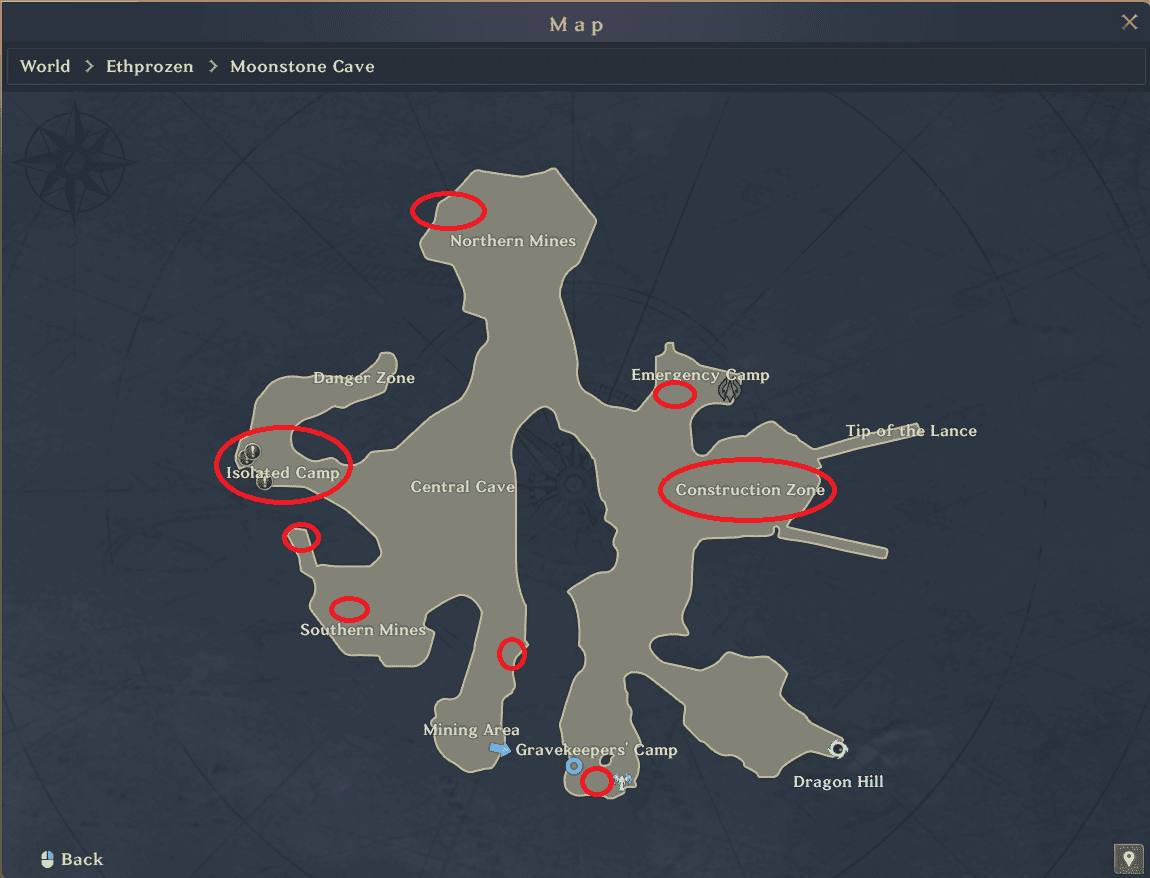
After speaking to Professor Bell, he will assign you quests that require entering Moonstone Cave. The first area of the cave can be tackled solo by defeating the sporelings near the Gravekeeper's camp. However, the mainline quest will ask you to retrieve a memory from the large knight in the construction zone, which is difficult to accomplish alone. It's much easier with the support of other players providing healing or dealing damage.
Once you've obtained the memory, interact with the memory crystal to access your system room, where your guide, Lillith, awaits. Upload the memory in the center of the room and teleport back by pressing the system room button on your phone.
Completing this quest line leads you to a camp just north of the construction zone, where you can activate a warp crystal for convenient travel between there and Ragnadea. However, things become tricky here as NPCs will assign missions marked with [ELITE], indicating the need for a group to complete them. Professor Bell will also give you a quest to defeat the Arachness Queen and Morde, which is marked as Elite. Even a full group of level 12 characters will struggle to complete this, so it's advisable to seek the assistance of higher-level players. Alternatively, multiple groups can work together to complete these quests, though it may take time as loot drops are based on the player who lands the final hit on the slain creature.
If you don't have access to higher-level support, you can focus on completing the mainline quests and easier side quests. Then, venture outside and head toward Petal Meadow, where you can repeatedly complete a quest that requires slaying elementals and meadow creatures. Keep in mind that this method can be time-consuming and repetitive.
Quick leveling tip: If you're doing the repeating quest, try teaming up with someone else doing the same quest, as most of the experience comes from completing it!
Level 15 – 20
This is where the real excitement begins! You'll choose an augmentation for your character and start specializing in your desired role. It's also the perfect time to participate in rifts with groups, starting with the Goblin Looter Rift located in the Petal Meadow area of Dragon Hills.
For the Goblin Looter rift, you'll need a well-balanced group consisting of a tank, a healer, and two damage dealers. The tank should be cautious and engage only a minimum number of creatures in each encounter since rift creatures hit extremely hard.
The Goblin Looter rift features 4 mini bosses and a main boss at the end, with plenty of goblins in between. Engagements in this rift are fairly straightforward and don't require any special maneuvers. The mini bosses primarily use direct attacks accompanied by straight-line AoE attacks. Simply move out of the way of the red box shown by the boss to avoid taking damage.
During the final boss encounter, it's crucial for players with interrupting skills to use them, as the boss has several charged-up attacks that deal significant damage in a straight line. Interrupting these attacks is vital to prevent party wipeouts.
It's important to note that each rift has a maximum completion time of sixty minutes and requires thirty fatigue points to enter. Fatigue points reset at midnight UTC every day, allowing each person to participate in a maximum of four rifts per day. Fatigue point potions can supplement this limit.
If you're having trouble finding a group to do rifts with, you can continue your journey through Dragon Hills, battling more Nebarks and Goblins on your way to level 20. As part of this journey, you'll undertake the mainline quest that involves removing traps and inspecting the Chaos rifts at the end of the Dragon Hills area. Look for the traps near the end of the Nebark trail on the western side, as indicated on the map below. Alternatively, you can return to Ragnadea and check the bulletin board in the Plaza area. It offers quests with significant experience rewards in exchange for fatigue points.
When it comes to the Chaos rift at the end, exercise caution. Stepping into the Chaos rift activates the PvP mode, allowing non-clan members to engage in combat with you. Once you're engaged in battle, you won't be able to step back through the portal. Be aware that players in the Chaos zone are usually level 22 and above, making them formidable opponents.
Quick leveling tip: Try to complete the Goblin looter rift from level 15 onwards if you can find groups, if not complete the quests from the bulletin boards as one round of quests from there will easily provide you with a level.
Level 20 – 25
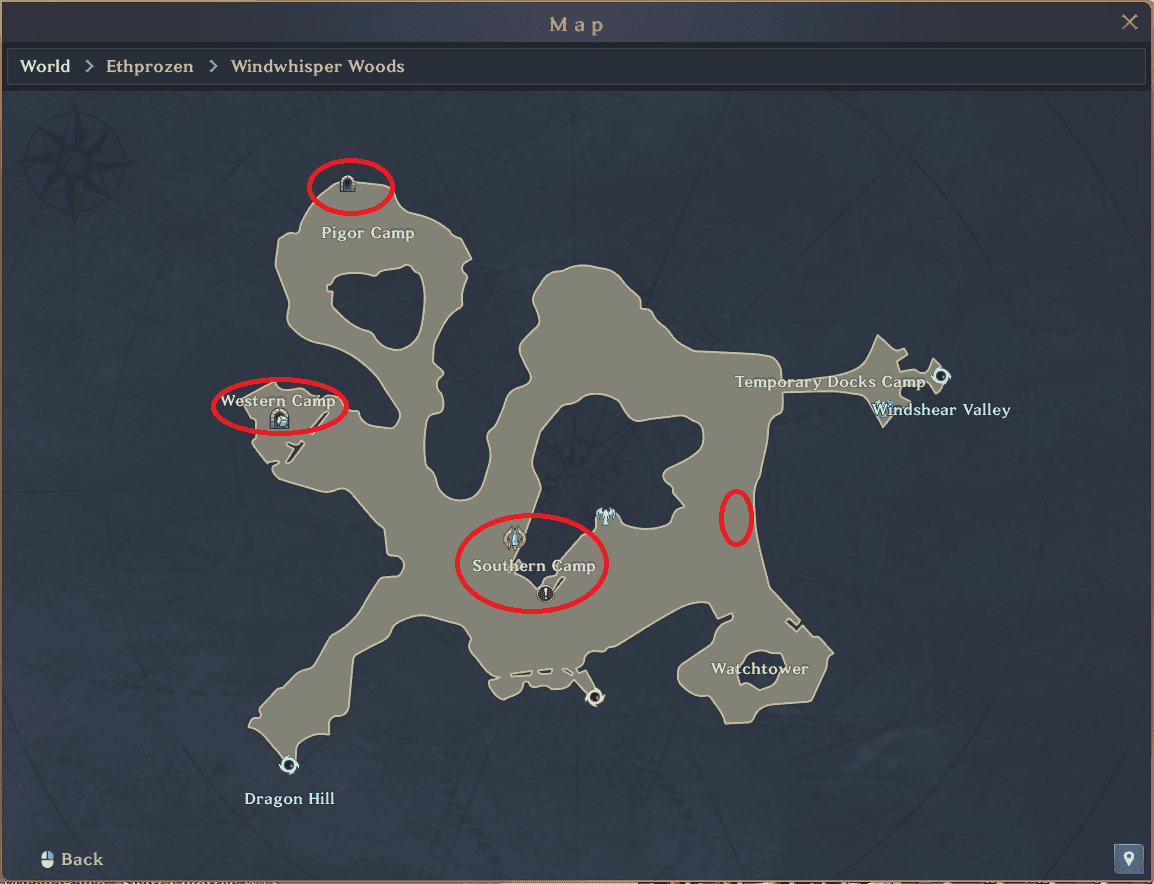
Upon reaching Level 20, you'll enter the Windwhisper Woods area. Here, you'll embark on a variety of quests that involve slaying creatures around the Southern Camp to gain valuable experience. Among these quests is "Repairing the Eastern Tower Part 3," which requires defeating a group-level boss near the Watchtower. It's advisable to tackle this quest with the help of others or wait until you're at higher levels, as MadBoar hits extremely hard and has a devastating charge attack that can knock you down if you're caught within the red box when he finishes casting.
Completing these quests will bring you close to level 22. However, reaching the higher levels becomes more challenging from this point onward. To continue gaining experience, you have two options: either run the Pigor Fortress rift located in the northern area of the map or complete the updated quests available on the bulletin board once you reach level 20.
An intriguing area on the map is the Cube Instance. In this mode, you'll face waves of creatures for a duration of ten minutes, with the objective of protecting the cube from being destroyed. The cube has a total of 400 HP, so it's crucial to eliminate the creatures swiftly to minimize damage. This instance requires a group of four people, but it doesn't necessitate a dedicated tank or healer.
A team composed entirely of damage dealers can successfully complete this instance. Once the ten minutes are up, you can interact with the cube, allowing you to purchase monster soul boxes using cubes. Additionally, you'll receive cube points, which can be exchanged with Rose the Cube Researcher, located near the Plaza in Ragnadea, for various rewards.
Now, how do you obtain cubes? Recall the Chaos Rift you encountered in Dragon Hills? The monsters inside the rift can drop error codes, which can be exchanged with Lillith in your system room for cubes, XP scrolls, fatigue potions, and rare equipment. These items hold significant value, prompting clans to band together and venture into the chaos rift to defeat bosses and collect error codes. By doing so, they make it easier for their members to level up and enhance their gear.
Quick leveling tip: Join a Clan! This is the easiest way of finding members to complete rifts with as they are likely to be in the same position as you.
We hope this guide assists you on your thrilling adventure in Gran Saga: Unlimited! The upcoming guide will delve into the higher levels, including engaging in group activities like raiding.
If you're seeking a clan to join, consider the PolkastarterGG clan, which warmly welcomes active members, especially during the playtest. Join us in exploring the vast continent of Ethprozen and experience endless excitement!
Share this article and tag us on any of our socials to let us know.

